ShopDreamUp AI ArtDreamUp
Deviation Actions
[Slightly Updated]
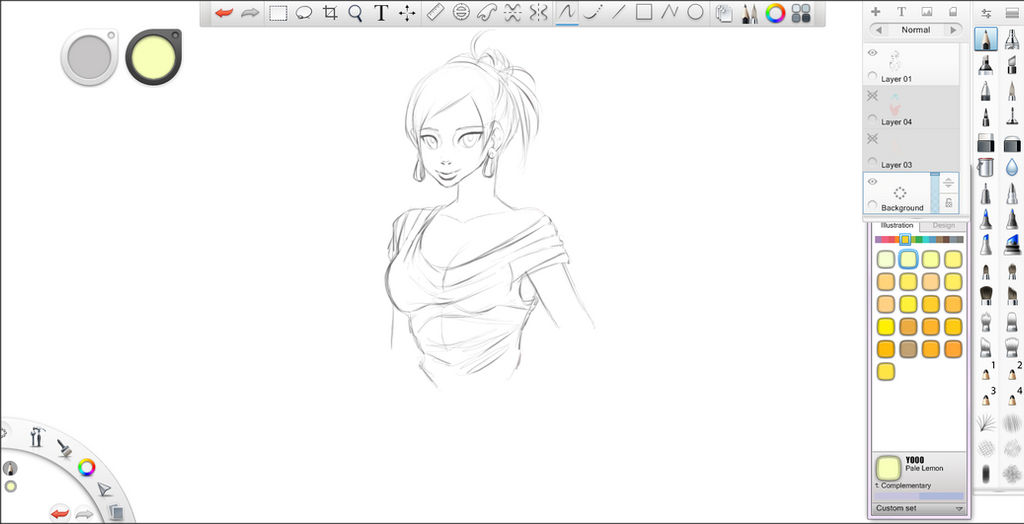
How to use, how to change and edit brushes, how to colour, how to ink, how to smooth ink. How to get the copic markers, and symmetry and whatever else. The how to. How to open and arrange windows as well. First all the functions and where everything is, then drawing.- Open. Grab the top of your tool bars and arrange to something cosy. Marker in red is where to click and drag your tool panels. Grabbing the outter edges of most of the tool pannels will move it about.

- The tools marked in red, the white and black puck. When you click and hold then drag in/out or up/down on the white puck it will change the size of your brush, if enabled in preferences it can also change your brush opacity. I have this disabled because it annoys me sometimes but it can be extremely helpful. The black puck, will change the colour you are using if you click hold and drag, up, down, left or right. If you click and release just once a colour wheel will appear.

- The top tool bar marked in red. These are your main options and tools. I'll tell you what each icon is and it's function. First one is undo, next is redo. 2nd, rectangle select and Marquee tool/selection tool. Crop tool. Zoom which also functions as the hand/move tool. You can pan around the canvas using the zoom tool. The capital "T" is the Text tool. The next tool is the Move and Rotate and Scale tool image. Next is the straight ruler, ellipsis ruler, french curves ruler. The strange almost hour glass icons are the Horizontal symmetry, verticle symmetry tools. You can't move them around, the always stay in the center. The next tool is the Freehand drawing then the steady stroke (smooth drawing, control how smooth you want your inking to be. Good for artists with shakey hands) then the line tool, rectangle drawing tool, polyline tool and ellipsis tool. The last set of tools are the Layers panel pop up (this opens the layers panel window. Mine is already open in the image below). Pens (this opens all your drawing tools, mine is open and you can see the choices. If you click this you can display the tools or hide them. It depends on how much room you'd like on your canvas) Colour wheel show/hide and last is the Copic library. Shows/hides the copic library. All of these tools can also be found under the Window tab at the top.

- The next thing marked in red, I didn't know what to call it other than options and settings but I found out it's called the Lagoon. Click and hold then drag but don't release, drag onto an icon that pops up in this area and if it's the tool you need, release your click over the icon. If it's not the icon you need, go to the centre and release and you will not pick a tool. If you hover long enough windows tips will tell you what it is. It shows all the same functions as the tool bar I just described, with a few other settings such as save and how the window is displayed. The undo button is also there, visible as red and redo as green, change colours and the icon of the pen is showing that is what I am currently using.

- Where the arrow is pointing, clicking this will bring up the window of pens and brushes you see now. These are your choices of what you can use to paint with. Much bigger selection than the older Sketchbook Pro. Clicking the same icon will hide the window. Whatever you click will be immediately selected and ready to use. Clicking an icon from here and dragging it onto your pens and brushes tool bar will allow you to make your own favourites set. You can simply drag and drop it over the top of brush icons that you don't like or want and replace them with something better.

- The icon marked in the red box, this is your brush settings. Here you can change pretty much everything about your brush and how it functions. Clicking edit will give you more choices of brushes to use and edit. depending on the type of tool, different things will be available to adjust. You can also make custom brushes this way by making a doodle and capturing a part of it. Edit the settings and you'll have a pretty crazy paint brush. See images for examples.


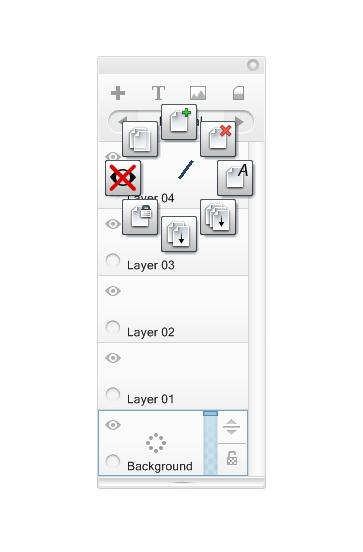
- Next thing I want to explain is the layers window. This kind of annoys me but you get use to it and it's a much faster way to use layers, I must admit that. The plus sign, adds a new layer. The next icon adds text, the next is import image and the last icon clears the canvas. Below where it says normal is your layer blending modes. This contains your photoshop like things such as multiply etc for those beautiful colouring effects but it's limited, there's not as much as PS. Now this is the part that gets a little bit fiddly and it's easy to make a mistake. Careful choose your layer. Click+Hold+Drag and more options will appear. These options include delete, duplicate, merge all or merge down and rename as well as hide layer. When you wish to make your choice, drag to the icon, if you change your mind and don't want to, then drag back to the centre to not select anything. The eyeball icon is the show hide layer function. The up and down arrows is how you can drag your layers above or below other layers and the padlock is to lock or unlock layer transparency.


- Now that I've shown you where everything is, next to explore is Preferences, under Edit menu. Carefully read and set this up. Then go to stylus responsiveness and take it all the way to the end. This will give you the maximum when it comes to pressure and everything else related to your tablet. I changed my max undo's to 50. Personal preference. Make sure to click each tab and carefully read and make choices on your settings. Then hit ok and it will be saved for each start up.

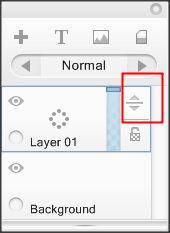
- Now that everything is set up, it's time to draw. Add a new layer. You should have two now. The original named background and a new one called Layer 1 as displayed below. Sketch on the layer called layer one. To select this layer simply click it once and it will have a blue edge and hue like in the below image. This lets you know it's selected. If in the event that you need to move your layers up or down, in the second image below marked in red, this icon will move your layers above or below other layers. What you do is click and drag that icon to move it where you want. The icon below that is layer transparency lock. I won't get into that function yet though.


- When finished you can lineart or colour, however it is you work. Add a new layer above and ink on the above layer. Turn your sketch layer on and off over time to see how neat your inking really is or use the blue bar near the padlock on the layer to bring the layer opacity up and down. Add a layer below the inking to colour and turn off your sketch layer so you don't get distracted. Try other settings with your brushes. Instead of doing the rest of this step by step I've made a youtube video though it's not sped up, you can definitely skip through it. Here's a few image steps anyway. I have to stop this step by step tutorial for another time. Unfortunately I had to remake the video so it's not the same artwork. Something went wrong with the codec. I'll update in a few hours with the youtube video of the drawings in action. Processing and what not just takes forever. But hopefully there's enough here to get someone started.

Also check out these videos, they show what I talked about and the second one is a review but it's very insightful. You could even class it as a tutorial in a way since he shows a number of functions and how they work.
How To Export Brushes Sketchbook Pro 6Open the brush library and go to the brush set you want. There should be a circle of dots. Click, hold and drag outwards and more options will appear. Two of those will be import and export folders for brushes.
Release left mouse button. A window to save as a zip will appear. Give your brushes a memorable name and save somewhere that is easy for you to find. I usually save my brushes to my desktop and put them elsewhere later. And that's it, you're done. Hope this helps!

Super nova
All access to art on demand!
Fun, vibrant images to brighten up your day..
I hope you enjoy using my art for exciting new adventures.
$5/month
Might Return
It's just a maybe at this point. I left DA because I moved on to animation and it's to hard to post animations here. You can catch me livestreaming instead of posting art.
Car Crash Yesterday
Yesterday in my timezone was my birthday and we had a car accident. The car is totalled and of course we need a new one. I'm okay, everyone was okay, just an unfortunate accident. I would open commissions but past experiences has taught me it's ultimately pointless so I won't bother this time. I will also unlikely be around on DA much at all except to dump a bit of art and run. I am mostly active on Twitter and YouTube now or livestreaming rather than DA since it seems DA is pretty dead these days.
I don't know what we are going to do but hopefully something will work out.
After Commissions Taking A Break
A lot is going on in my life right now and after I finish up my commissions I will be going on a break.
Demonetized
With the new rules, my channel will be getting demonetized. So if you have issues with the ads, then please don't take it up with me anymore, email youtube. Even better, get an AdBlocker extension from the extensions store on google chrome or for firefox. There's plenty out there that block those annoying and unskippable ads.
Featured in Groups
© 2012 - 2024 DraconianRain
Comments86
Join the community to add your comment. Already a deviant? Log In
Thank you for the tutorial but I am confused on one thing! How do you download the image? There is a save as button but it only saves as a picture and not a download so I cant post it as a deviation! Any ideas? Thanks!


