ShopDreamUp AI ArtDreamUp
Deviation Actions
WARNING IMAGE HEAVY BLENDER TUTORIAL
I decided to screen cap my way of going about it. I couldn't find stuff all tutorials about it and the ones I did find were for really old blender which only lead me to being confused. Instead I just went and learned Maya and 3ds Max edge loop tutorials, finally found a few decent speed modelling on anime heads and got a grasp of various ways to model 3D Anime heads and my odd semi-realism anime head. This has been hell and a half trying to apply 3D to my art style >_> Personally I like the box modelling method the best but my heads keep coming out with horse face syndrome at the moment XD Practise though should fix that in time. Anyway... Feel free to pinch/ use the reference images in this journal. If it helps you out then awesome.When I first started out I would start by drawing in the edge loops on a sketch and it use to really help me but now that I can visualize where they will be I don't need those guides any more or at least not as much. I definitely need them on complicated heads.
First is the set up. New from startup File. Delete the cube from the start up file. On your number pad, hit one to go into front view. Hit N and it will bring up a window to the right. Tick the box and then click the arrow to drop down the menu. Click "Add Image". Add in your front view image. But we'll have to tweak it.
When you add your image where it says "Axis" Select "Front" instead of "All" and this image will now only appear on the front view. Next go down to where it says x and y and adjust the numbers to align your image into the center. Mine was far off to the right so I had to go minus along the x axis. I just clicked the small arrow until it was in the middle. My image is enormous so now I am going to click where it says Size and change that to about 2. I marked in red boxes what I am talking about below.
Now next to the name of your image is a little downward arrow. Click that to collapse. This is so it doesn't get confusing. Once you have done that. Click Add Image again and add your side view. I want to add the right side view since that is what I am most comfortable with modelling but you can add the left if you like. Same process only where it says all, select "Right Side". If you press 3 you should see your side view reference image. What to change is marked in red again.Press N key to hide that panel now. If you want you can model with both views open. To do this go to the plus sign in the top right corner, just above that plus is a small icon and that is what you want to click and drag to open a new window. Ctrl + S to save. Save now and save often. Hover your mouse over the active window on the left, press 1 to go back into front view. Leave the active window on the right set to right view.
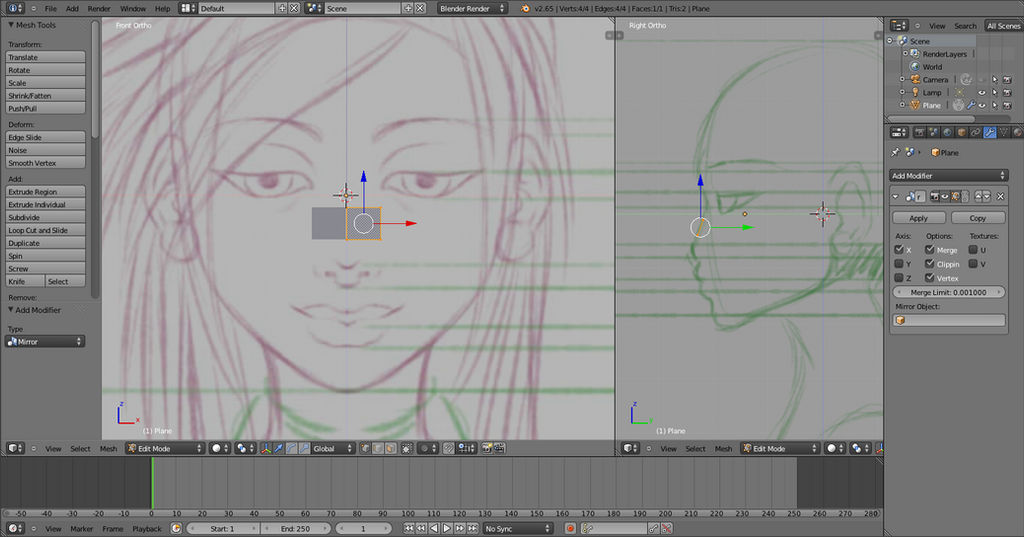
Shift+A to add an object. For this particular modelling chose a plane. It's flat on the floor at the moment. Go to the right view. Click R to rotate and hold shift. Should give you a nice and even 90 angle for the front view but we don't necessarily want 90 degrees. This will be placed on the nose. Click tab to go into edit mode. Move the plane to the nose and scale down to about band aid size. Below is roughly what we want. You'll see it aligns up nicely with the reference images. If it doesn't you may need to resize until it does. One of my images is set to 4 while the other is on 5. Even though the files are the same width the drawings themselves vary just a little bit and it makes a difference.
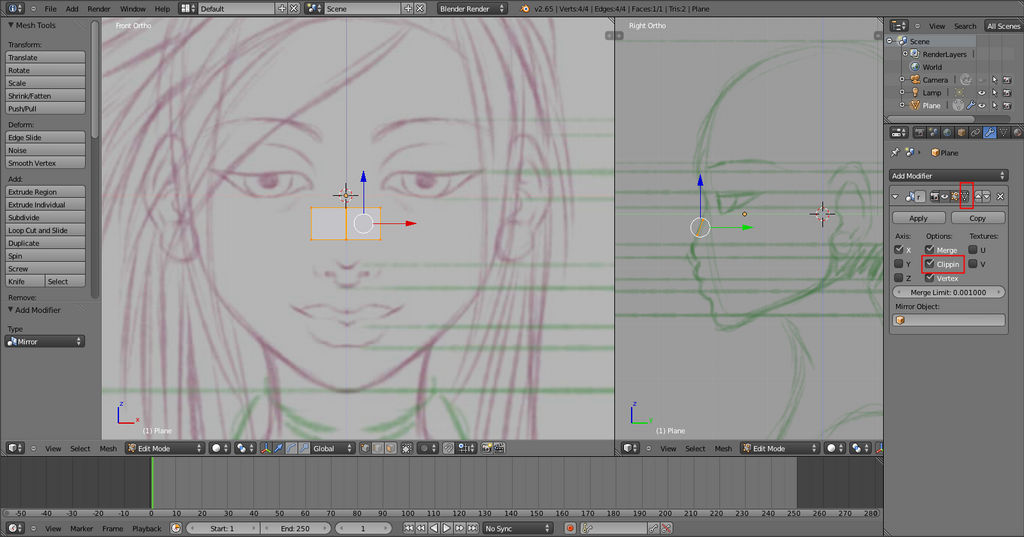
From here, go to the modifier tab. That's the icon that looks like a wrench. Select Mirror Modifier. While there also tick clipping. This will join the middle verticies together. There shouldn't be any funny business. Also while there click the three dotted icon that makes a triable to enable the wires to be viewable on the other side. This will enable us to adjust the other side as will with mirror modifying. Marked below is the things to enable.
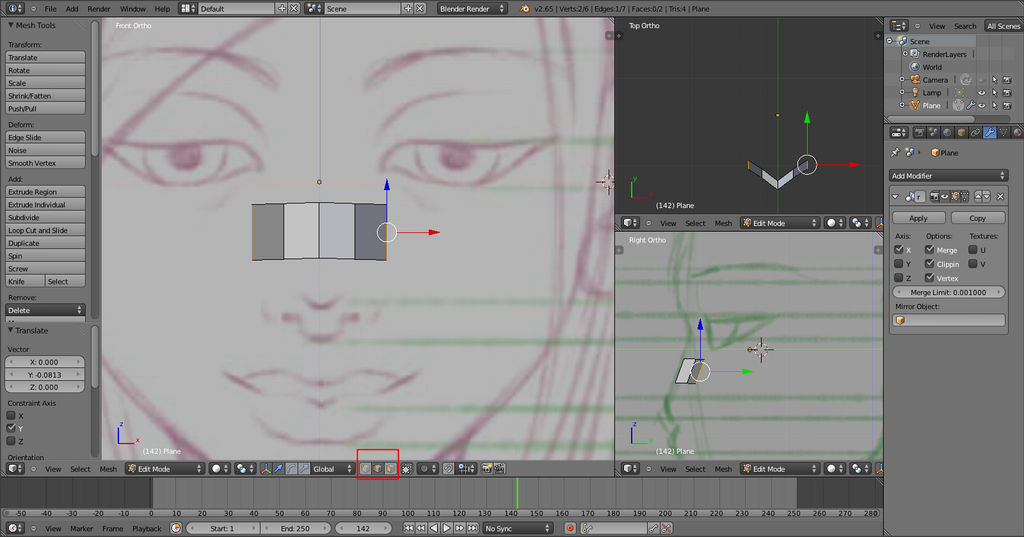
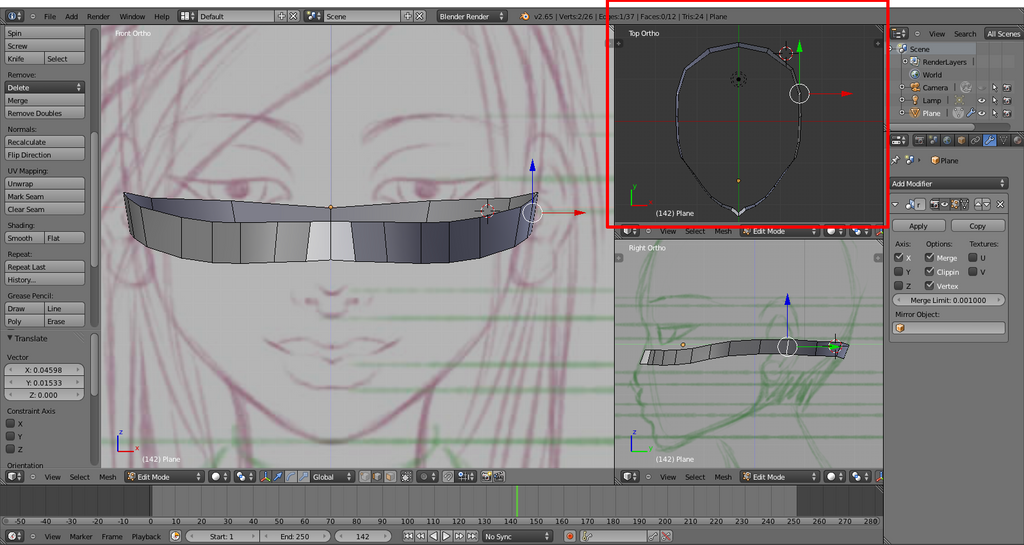
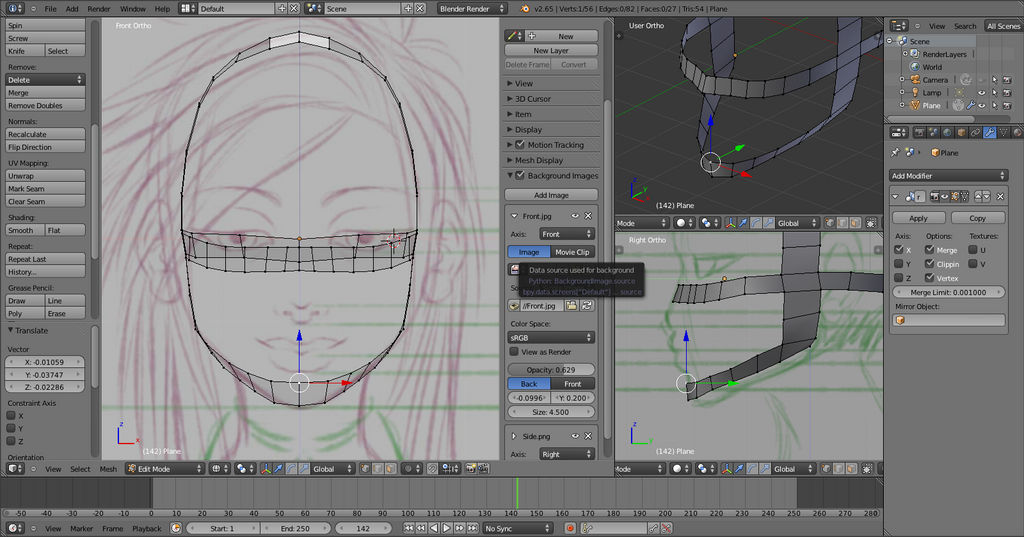
Make an edge loop around to the back of the head. But try to make it form the face shape as you go to make things easier. To view the top view, press the 7 key. From here I will post several progress shots of what this will look like since showing is easier than saying. Use "e" to extrude and go into edge mode and vertices mode or face mode when you need to. You can do so by clicking these icons marker in red below. Also, open as many view ports that you need or feel comfortable with.
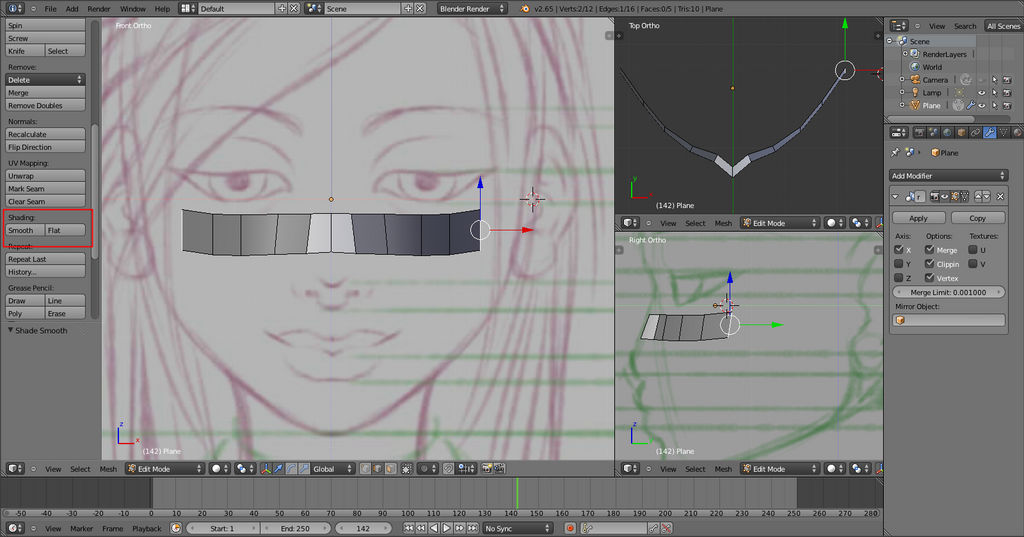
This is where the top view really gains importance. The base of the head at the back should be your last joining line. Because mirror clipping is on, if you slide it all the way to the centre it will stop in the centre. Then using top view, tweak the head shape.
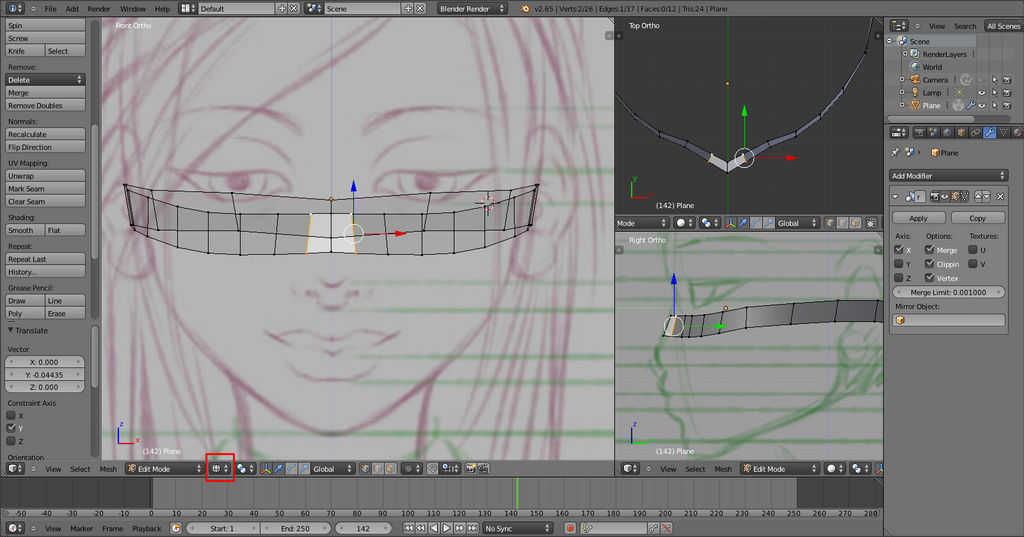
Use your sense as an artist when making these loops. Try to estimate where the cheek bones are, where the eye sockets are etc and any face indentation. I've slightly adjusted my edge loop now to be more thick in the cheeks and the nose slightly less pointed since it's a very slim nose. Next edge loop will be the chin and then the forehead. This will give us a bit or a cut off area before adding the eyes. Many tutorials I've followed do the eyes and mouth edge loop but as a beginner I found that my faces even with references keept coming out very flat and wide. Very very wide actually. Before going further however, change the front view to Wire frame View as marked in below how to do so if you don't know how.
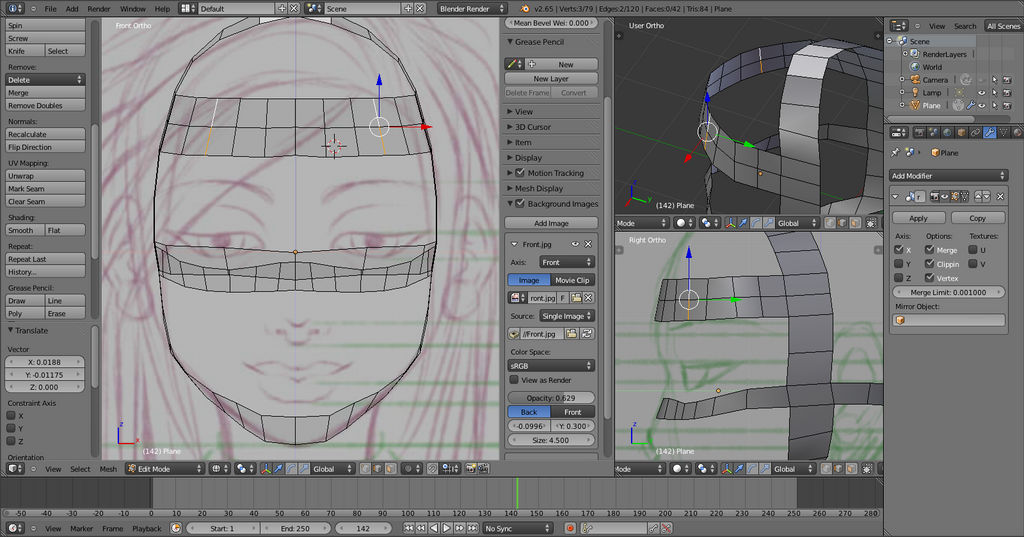
Where the ear is, extrude up and below. This will be our marker of where we want to stop out forehead and jawline edge loop. Continue the edge loops around. The top of the head and along the jaw line. The top of the head loop when you get there, try to make it as many faces long as what's alread on the front of the face. If it's not, that's ok I'll describe how to delete and adjust. No triangles though. Be careful and mindful of how it will line up later.
This is also the hard part. Your reference might not line up well at all. Then it's guess work. You have to use a lot of creativity and try to get it to look like the reference more than align perfectly with it. So don't get upset if it's not lining up well just do your best to get the face shape as similar or close as possible.
Mine don't add up just yet. I have less rather than more. The reason for that is because it's easier to loop cut than it is to delete too many faces. "Less is more" ^w^
From here I will be adding extra faces on my belt by pressing ctrl+r. Use the "G" key on your keyboard to grab if you don't like the 3D cursor on these tricky angles. Make the forehead area from the edge loop of the head. This will help you a lot now when you start to build the nose. The jaw line area should help to when making the lips. But we might push and pull that later as time goes on.
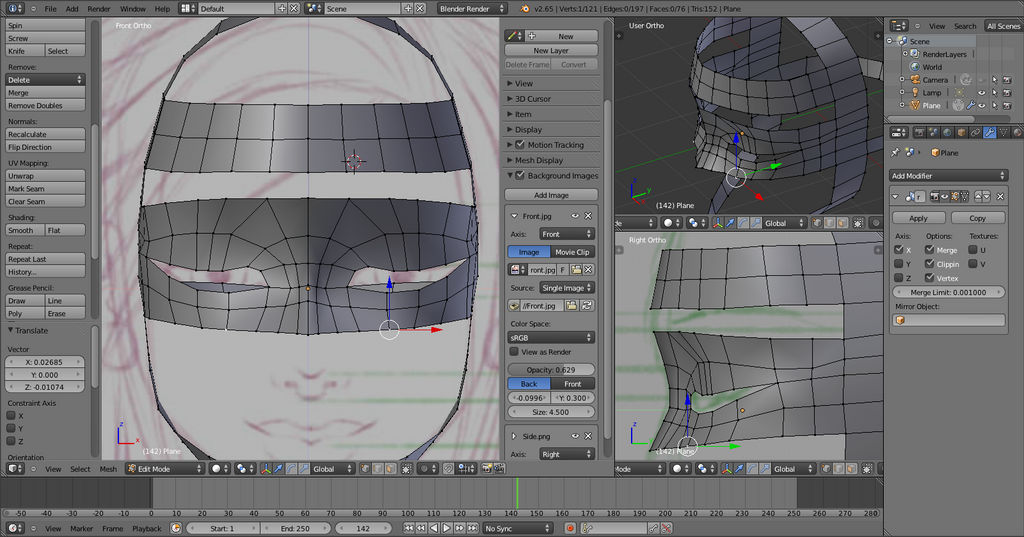
Select the edges under the eyes or the edge from the nose bridge and extrude upwards. Rotate and move the edges or verticies around to start making the eye shape. Use your reference and some guess work on how you think that would look. Select the edge on the outside to the bottom of the inner eye. This is where we'll start a new edge loop for the eyes. When you get close to the end, select the two corner verticies and press Alt+M to merge. I marked in red where I joined my verticies.

Extrude and merge where necessary the rest of the eye to the side of the head edge loop. If this happens like below where you need to cut a line into a face, simply loop cut so it will fit (Ctrl+R). The other alternative is to cut it by pressing "k" click the points you want to cut in then hit enter to make the cut final.
Because it's slightly anime style there aren't as many eye edge loops to do as you would on a realistic head. But there's more work to be done on the eyes yet. Only add extra loop cuts where necessary. If you can use less faces than I have the better because it will be simpler and easier to manage. So lets have a look at it so far.

It's starting to look like a mask. Which is good. The face is taking shape well. Now I want to bridge between the eye and the nose. And add just one more loop on top of the eyes and then fill the gap of the forehead. It will look something like this. Then All I have to do to join the forehead to the eyes is select 4 Verticies and press "F" to make a face and fill the gap. If you have too many faces and don't want to loop cut, press Ctrl + E and go to Edge loop select or manually select the edge, press "X" on your keyboard and select "Delete Edge". Then you can use F to fill in the new gap.
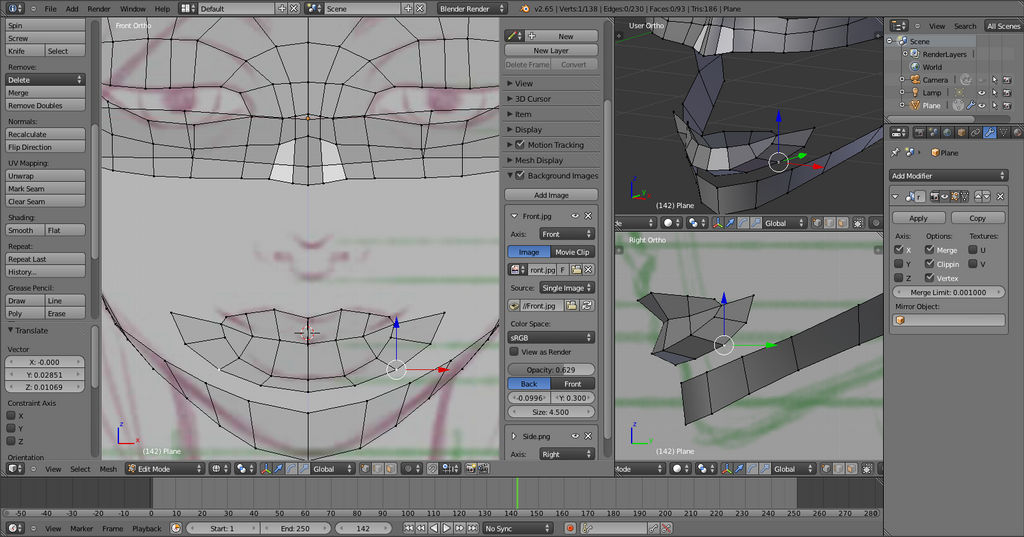
Do your best to keep the topology as clean as possible the whole way. This is the part I personally hate because it's tedious and quite a challenge. Left click and put the 3D cursor on the center of the lips. Shift+A and add another plane, scale and rotate, push to the front where the lips are. Don't do anything to deselect it untill it's approximately where you want it or at least in front of the face way from your current mesh. Don't want to do anything to get it lost in there. You should then end up with something like this after you resize it.
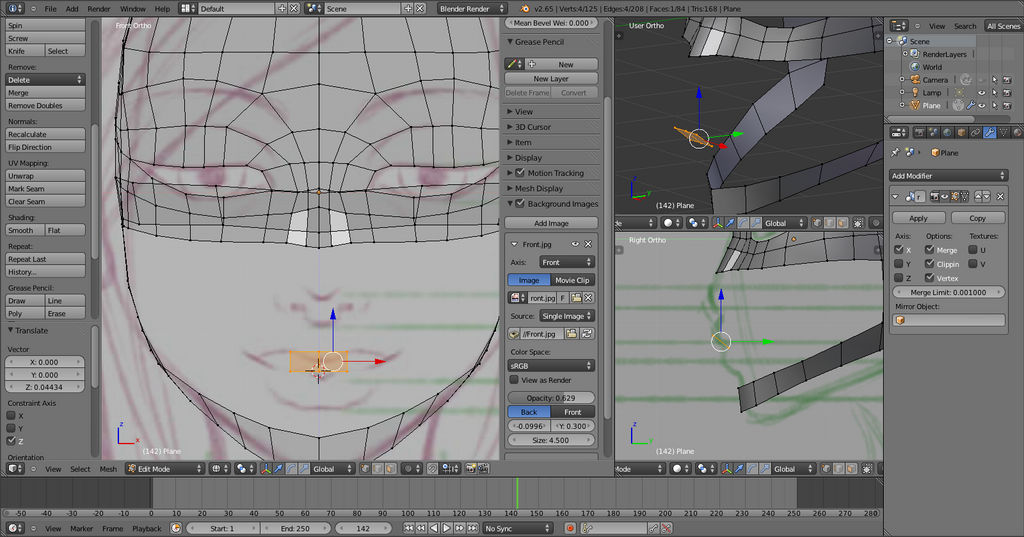
Extrude, scale ("S" Key) and rotate until you have your upper lip. No tri's though. Just make it a small square.
Bring the top outter edge of the square inward to make the lip look pointed at the ends. It needs to remain a quad for smooth edge loops and so there are no line deformations in the face later. If you keep all of your quads nicely lined up and do your edge loops well the face should come out nice and smooth. It's better to give the illusion of a tri at this point.
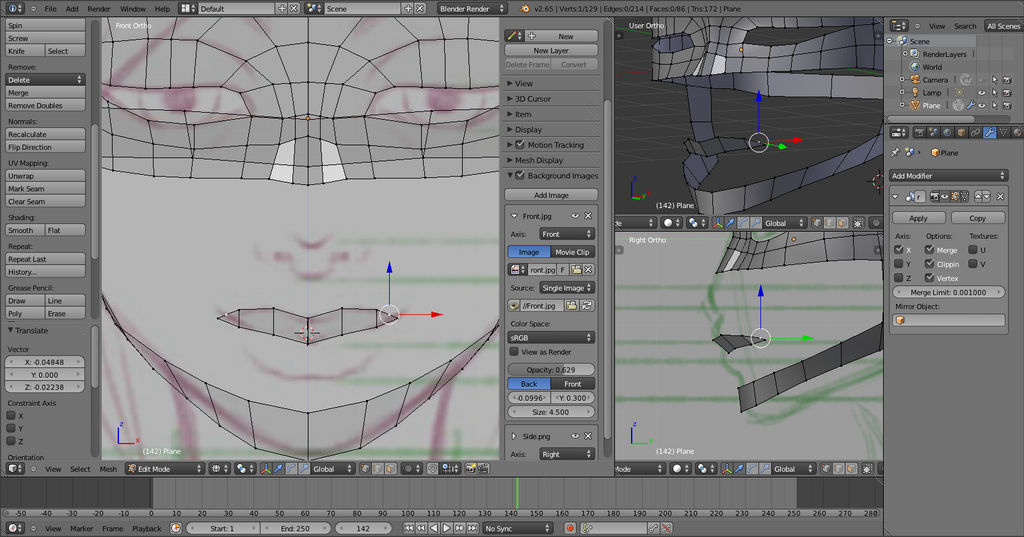
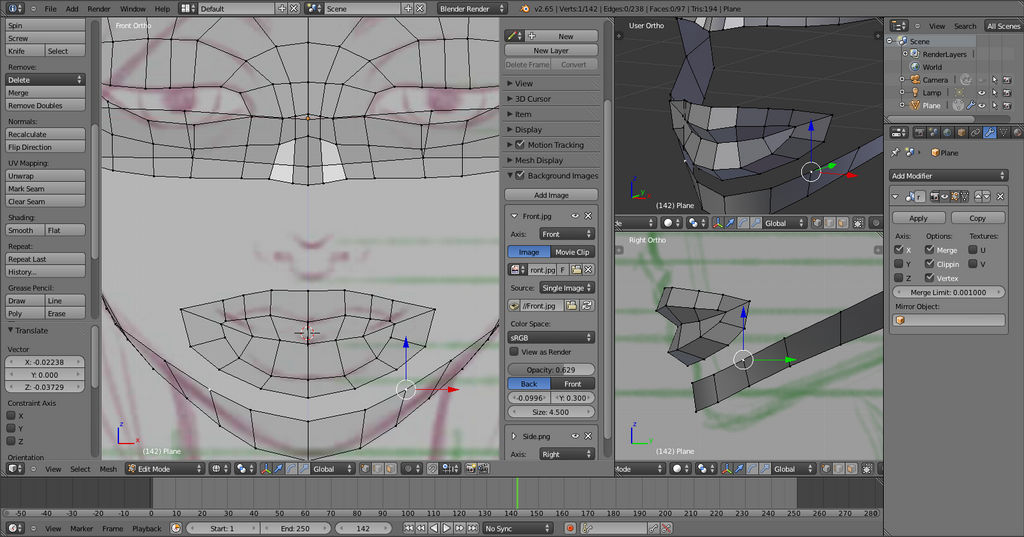
Select the edges and extrude for the bottom lip. Align to the lip shape you desire. Similar to the eyes, there needs to be an edge loop around the mouth. This will help give the lip shape and eventually join nicely to the nose and cheek. Extrude the lower lip half first and try to align the verticies to the jaw line. You may have to cut faces if you need to. It should look similar to this.
Now complete the edge loop for the top of the lip. And there it is, the first mouth edge loop. To neaten things up you can go ahead and join the jaw line.
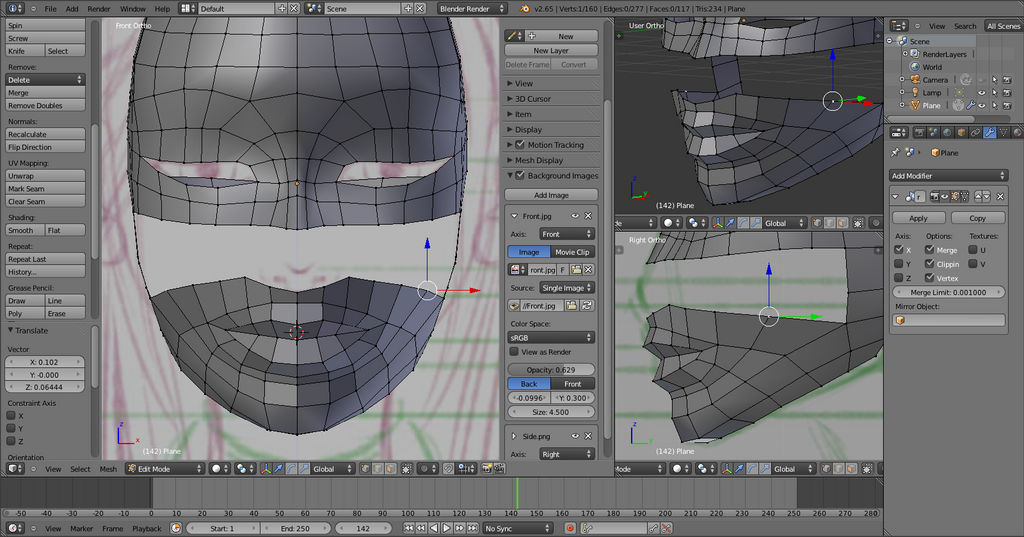
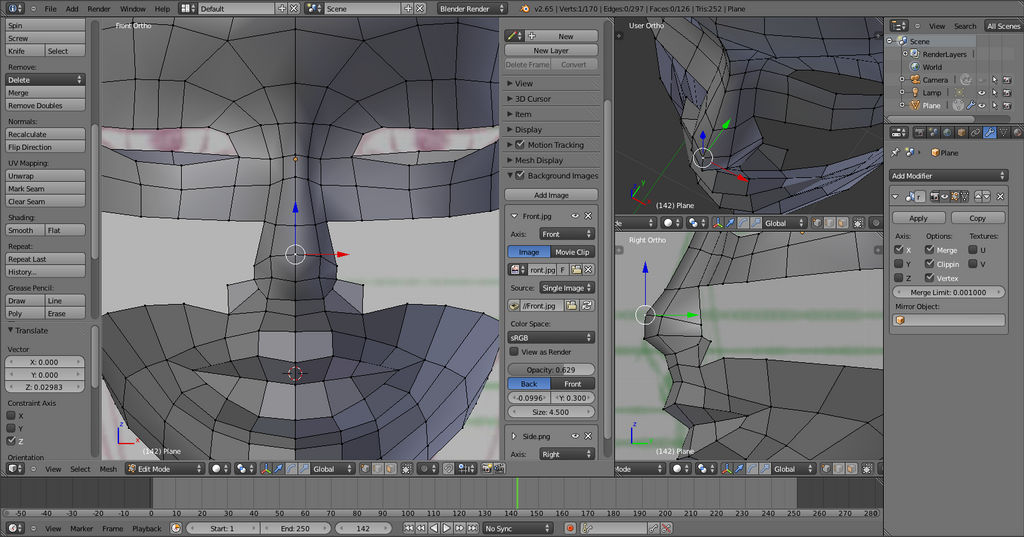
Select the two edges from the nose bridge and extrude them down. Join them to the top of the lip skin area. Shoul look similar to below. Just like the lip corners pinch in the corners of the nose. I like semi-realism anime style so my nose is fatter at the the bottom than most anime 3D heads but it's still a small nose and my lips are much bigger at the moment but I may change that later. If you do your lips thin and small a thin nose shouldn't be to hard to do with this technique. Just keep trying. Use the top view to really see the nose take shape as you model. Don't just rely on the side view and front view alone.
The area I joined is going to disturb my topology so I'm going to cut it with "K" and delete the triangle leaving me with this. Now I can fill in the cheeks.
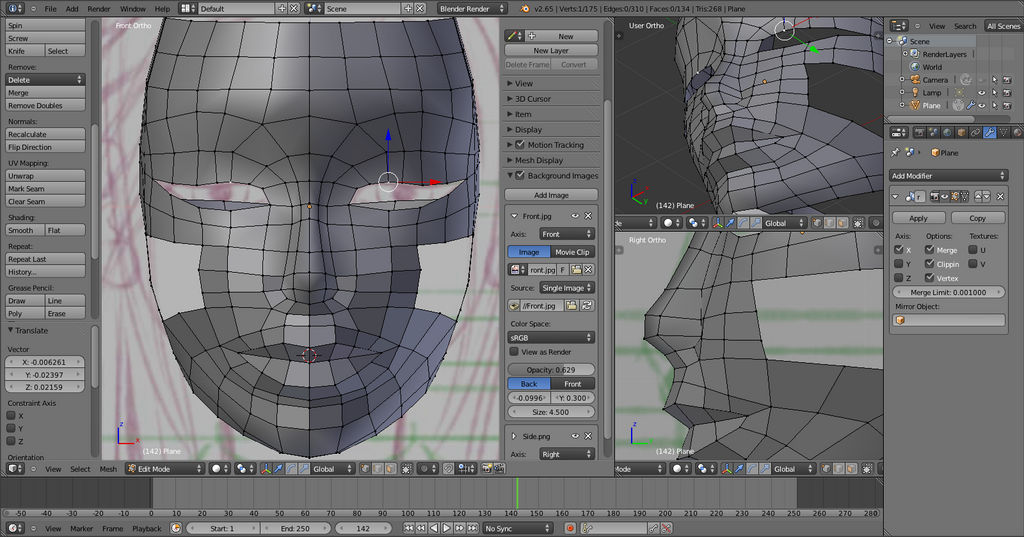
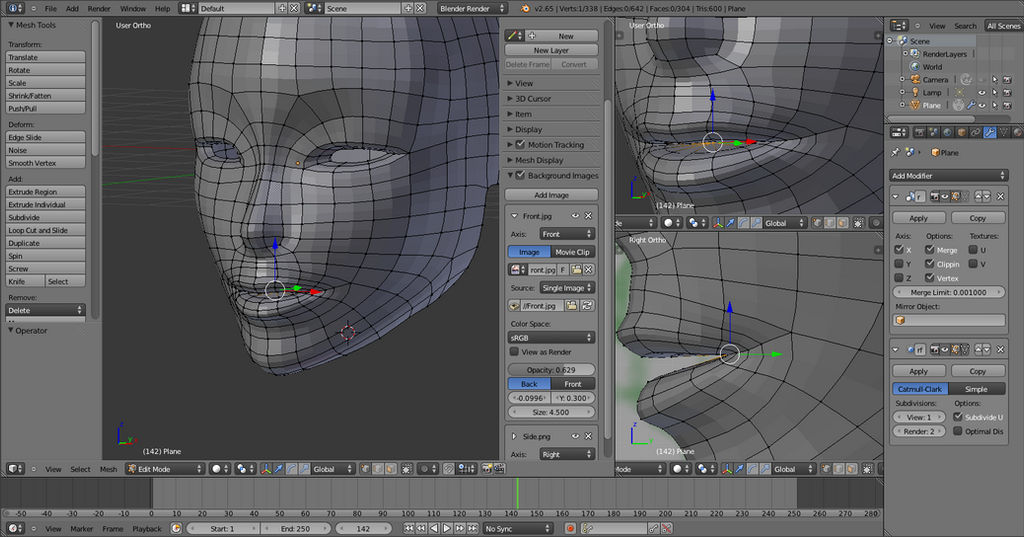
You can see I've slimmed down the nose. After fixing that one quad the face is filling out nicely. No matter the eye or lip shape, edge loops are important. I had to learn that one the hard way. Below I turned on and off smooth shade. I also misjudged and had to put in a few edge loop cuts.

To further neaten I removed a few loops and joined the faces, lowering the poly count and making the face take shape better.
Do similar for the back of the head as you did for the face. Make an edge loop down the centre and join it to the had at the back and fill in the gaps. Kind of hard to do to get the nice head shape but be patient and fill it out.
If you want to define the lips more either edge loop cut or use "K" and cut it manually on the inside. Move vertices around and shape as you go and delete the middle and open the mouth. You could if you wanted to go much further for animation and add teeth and a tongue but I'm not going to cover that.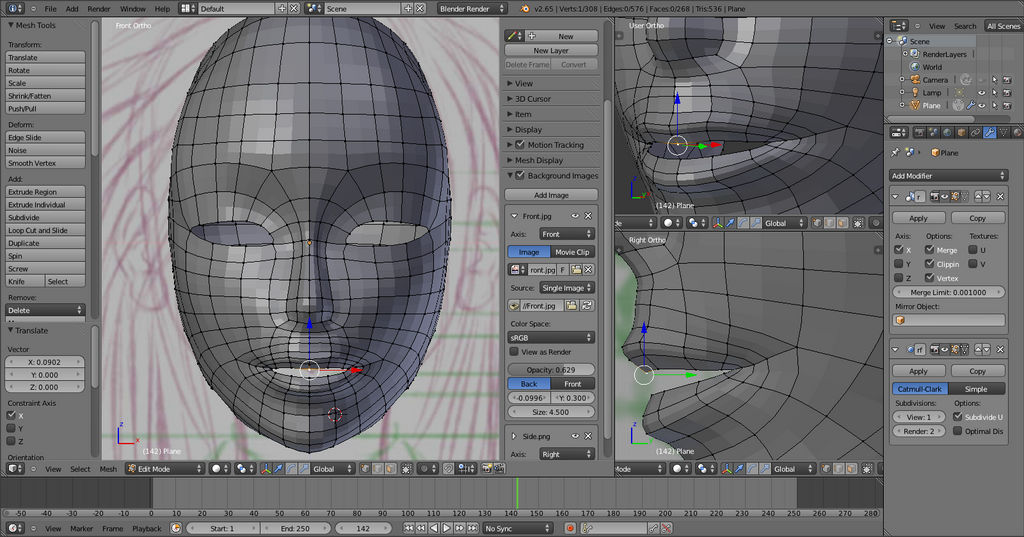
I've applied a subsurface modifier so I can work the lips into a nice and natural shape that fits my male character better and also so I can make the eyes nice. Next Select the eye edges and extrude and scale down. Extrude inwards. I don't like to make a socket but some people do. Since I opened my mouth I'm going to do the same to the mouth only with my last extrude I will hit Ctrl+M and join at centre to close off my mouth inside. I don't have plans for this model so I'm not going to model the insides of the mouth. This is more just to show how to do the face and how the mouth might look if it were an open and working one.
Tab back into Object mode. Shift+C to place the 3D cursor back to the centre. Shift+A and add a UV sphere. Tab and go into edit mode. Go to modifier tab and add mirror. Move the sphere off side and scale down. However made it disk shape. If you're using the latest version of blender like I am, press "S" and then "X" to scale only along the x axis and then press "S" again and then press "z" to scale along the z axis and lastly do the y axis in the same way. Because my character has long eyes I need an oval more than a sphere so scaling using these short cuts I was able to make an oval.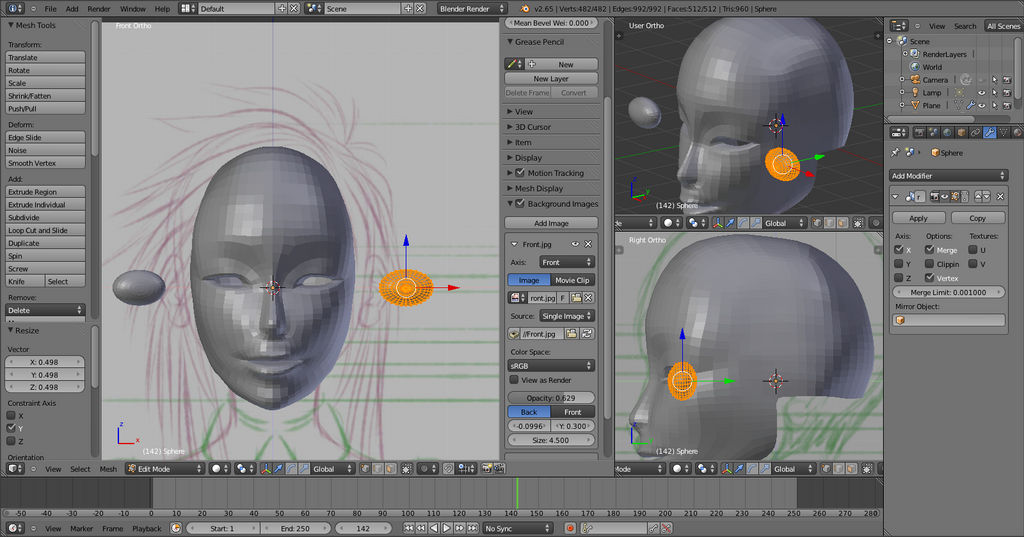
Some scaling and rotating may need to be done. Because of how the eyes were extruded the sphere should fit nice and snug in the eyes.
If you plan to animate your eyes and model it would be a good idea to parent the eyes to the head. Here is the current result.
This is as far as I can go for now. I need rest. I modelled this as I wrote the tutorial. Tomorrow... or another day I will go further and add an ear, neck and hair and then MAYBE if possible I might cover UV textures.

I've applied a subsurface modifier so I can work the lips into a nice and natural shape that fits my male character better and also so I can make the eyes nice. Next Select the eye edges and extrude and scale down. Extrude inwards. I don't like to make a socket but some people do. Since I opened my mouth I'm going to do the same to the mouth only with my last extrude I will hit Ctrl+M and join at centre to close off my mouth inside. I don't have plans for this model so I'm not going to model the insides of the mouth. This is more just to show how to do the face and how the mouth might look if it were an open and working one.
Tab back into Object mode. Shift+C to place the 3D cursor back to the centre. Shift+A and add a UV sphere. Tab and go into edit mode. Go to modifier tab and add mirror. Move the sphere off side and scale down. However made it disk shape. If you're using the latest version of blender like I am, press "S" and then "X" to scale only along the x axis and then press "S" again and then press "z" to scale along the z axis and lastly do the y axis in the same way. Because my character has long eyes I need an oval more than a sphere so scaling using these short cuts I was able to make an oval.

Some scaling and rotating may need to be done. Because of how the eyes were extruded the sphere should fit nice and snug in the eyes.
If you plan to animate your eyes and model it would be a good idea to parent the eyes to the head. Here is the current result.
This is as far as I can go for now. I need rest. I modelled this as I wrote the tutorial. Tomorrow... or another day I will go further and add an ear, neck and hair and then MAYBE if possible I might cover UV textures.
Super nova
All access to art on demand!
Fun, vibrant images to brighten up your day..
I hope you enjoy using my art for exciting new adventures.
$5/month
Might Return
It's just a maybe at this point. I left DA because I moved on to animation and it's to hard to post animations here. You can catch me livestreaming instead of posting art.
Car Crash Yesterday
Yesterday in my timezone was my birthday and we had a car accident. The car is totalled and of course we need a new one. I'm okay, everyone was okay, just an unfortunate accident. I would open commissions but past experiences has taught me it's ultimately pointless so I won't bother this time. I will also unlikely be around on DA much at all except to dump a bit of art and run. I am mostly active on Twitter and YouTube now or livestreaming rather than DA since it seems DA is pretty dead these days.
I don't know what we are going to do but hopefully something will work out.
After Commissions Taking A Break
A lot is going on in my life right now and after I finish up my commissions I will be going on a break.
Demonetized
With the new rules, my channel will be getting demonetized. So if you have issues with the ads, then please don't take it up with me anymore, email youtube. Even better, get an AdBlocker extension from the extensions store on google chrome or for firefox. There's plenty out there that block those annoying and unskippable ads.
Featured in Groups
© 2013 - 2024 DraconianRain
Comments20
Join the community to add your comment. Already a deviant? Log In
I have problems with shading around the mouth when modeling. Does this method help solve those later problems or do you have any tips?


