ShopDreamUp AI ArtDreamUp
Deviation Actions
Image Heavy! So if you have an old or slow PC this tutorial may not be for you. It may cause lag or a crash. Just so you know.
This tutorial set will cover text and how to do comic style wavy text with a white outline. Panels dones with the panel ruler so when you draw in the panel nothing goes outside said panel without the need for selection tool. Screentones, custom tones and other ways to tone. Inking if I get far enough. And 3D materials for setting up scenes.
FIRST STEP: MAKE YOUR DPI 1200!!! You can change those at any point using layers alone! I'll elaborate more later.
In the below image. Hide beginners mode. Open the Navigation window, Colour, Layers and Tool Options in the Window Tab.
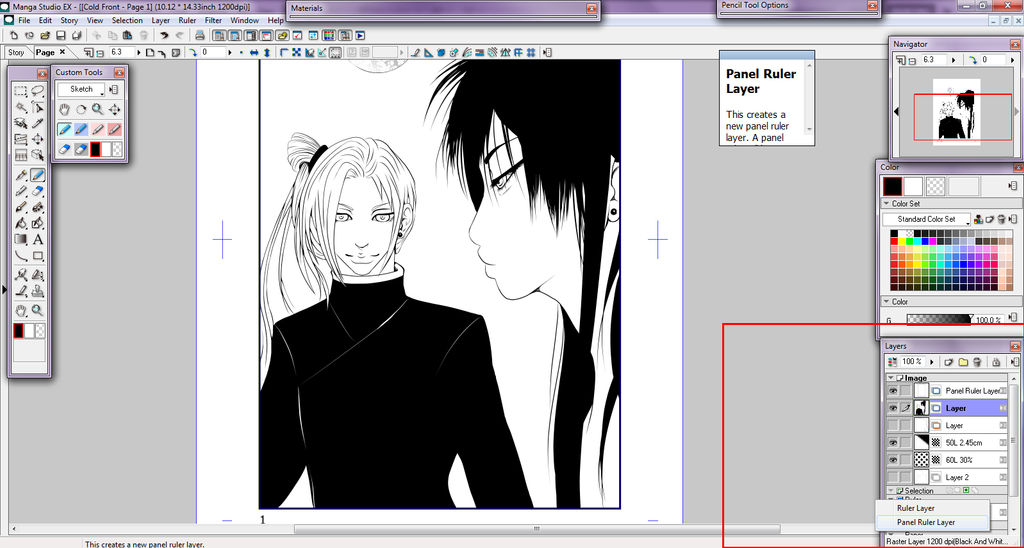
Where I have marked red go to the tab called Rulers. Left click and the option shown will appear. Choose Panel Ruler Layer.
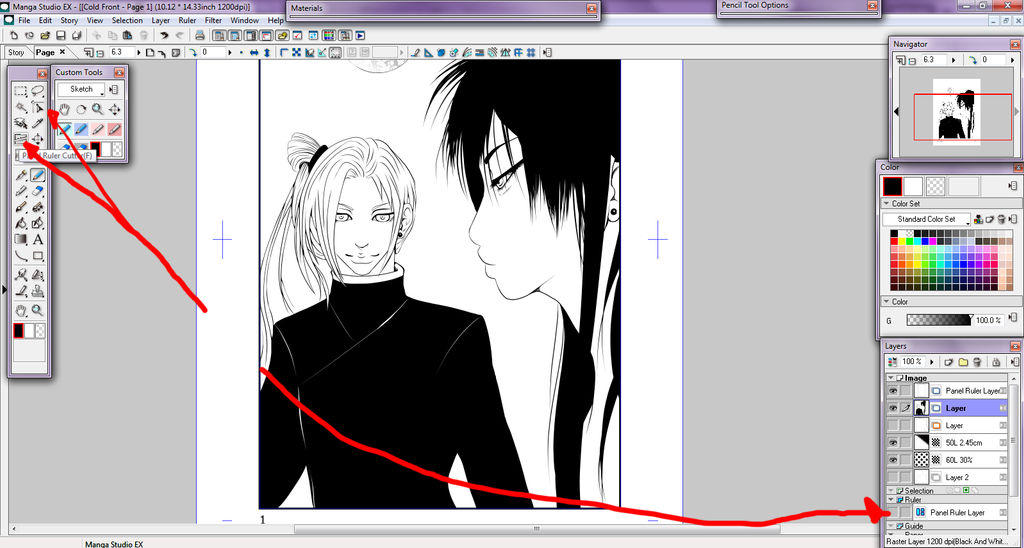
In the image below, use the two tools pointed to, to cut and adjust your panels.
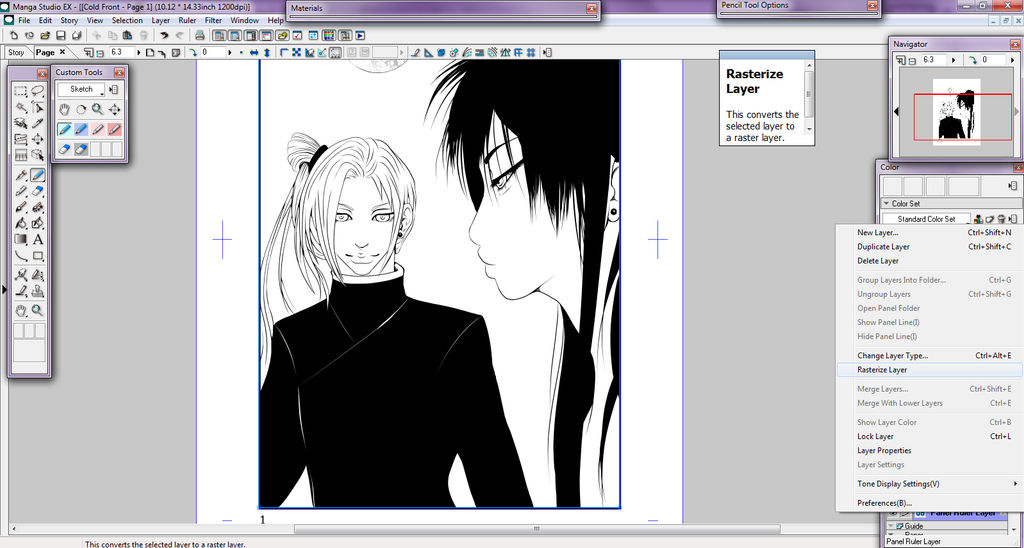
When you are ready, like shown in the below image, Right Click, go to rasterize. When asked if you wish to keep original you MUST click yes for it to work properly. It should auto hide itself. If not click the Eye Icon. You should now have an evenly lined panel. Now because we left the original panel ruler everything we draw in our layers will be done within those borders. Very handy for heavy inking and big tones.
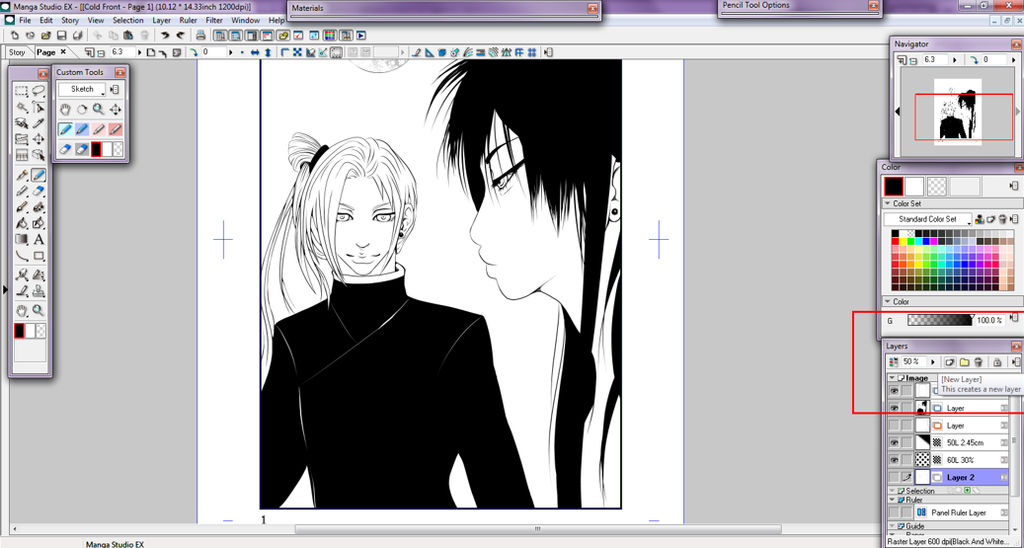
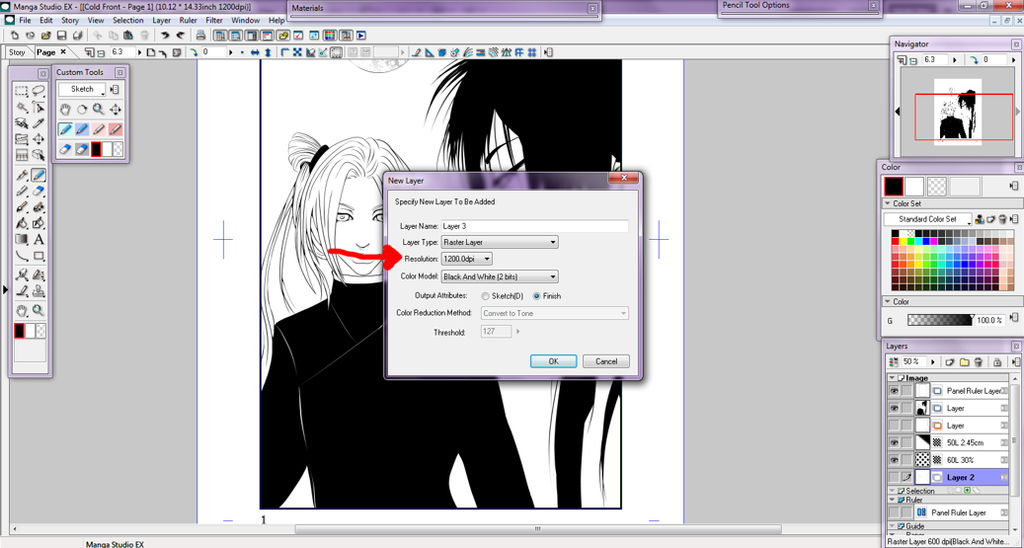
I have already inked but I will walk you through regardless. Click New Layer shown below.
For inking you want RASTER just like a photoshop layer. And 2 bit black and white. If you choose 8 you will end up with screentone strokes or dither or lumpy threshold. Choose this with 1200 dpi because we want the smoothest possible strokes.
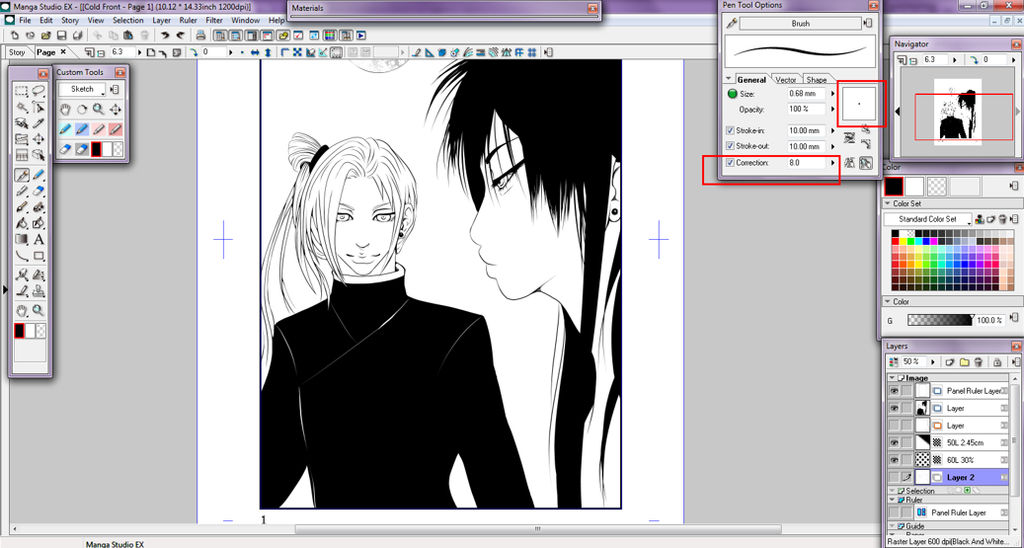
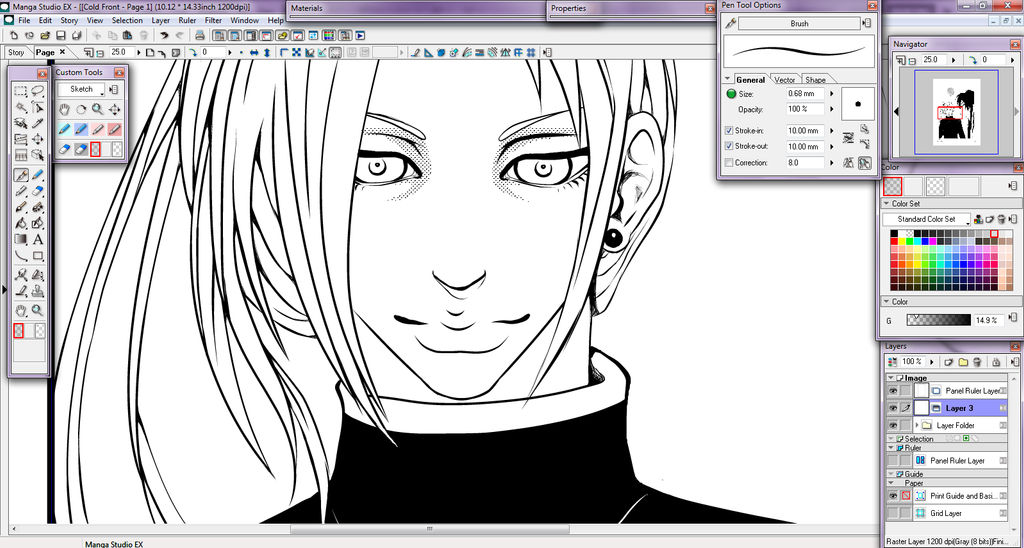
Now in the image below in tool options panel>> Correction corrects your strokes. Hovering over the icons next to it should tell you other correction methods you may find useful. Clicking on the box with the dot and draging can change the pen size which is handy for quickly changing size. Or you can specify with a certain number. The numbers are in cm though so be weary.
Now for inking long white hair like mine and the jaw line or arms with one smooth set line width I used a Vector layer. It has some really handy features. I really suggest watching this video for more and better info on vector layers and why they are good to ink with www.youtube.com/watch?v=XboMy_…
Next is Tones
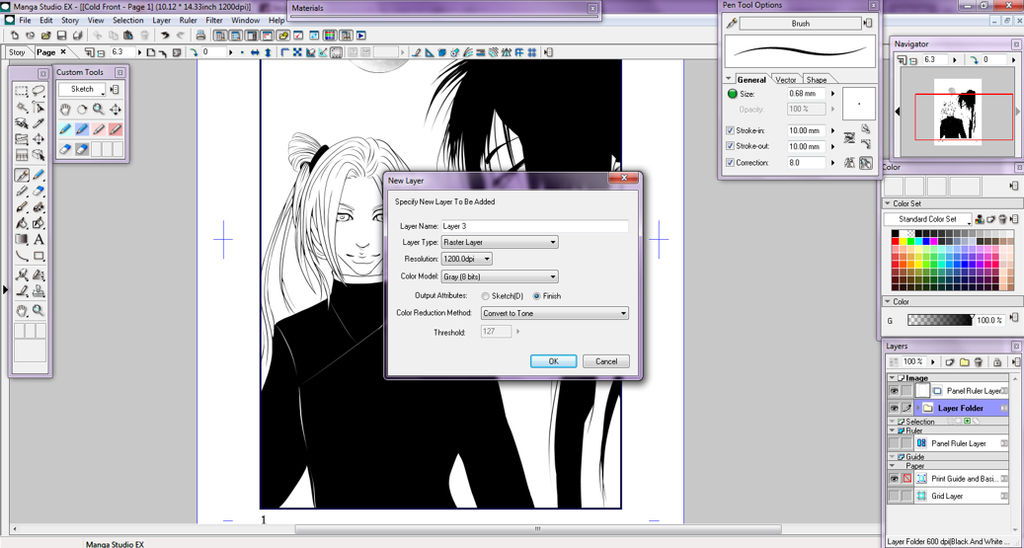
Go to Window and open Properties. Then New layer, set to 1200 dpi, Gray 8bit, Convert to Tone as shown below. Now everything you colour is a screentone. This is just one of many ways to tone.
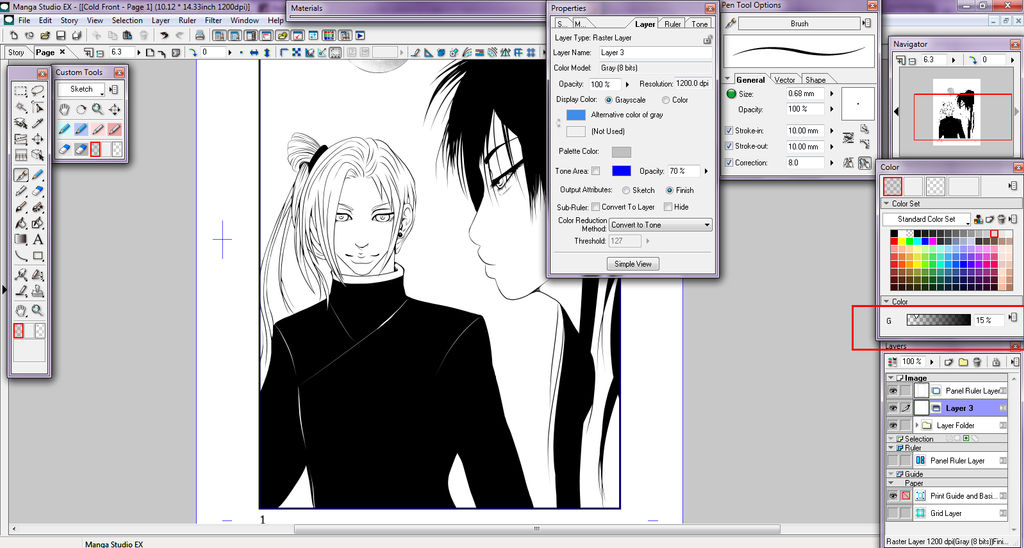
Why properties? Well there is a tab called Tones. This tab controls the size and just about everything to do with the screentones, even moving them around. If you use material tones on this layer you can rescale them to any size you want and change the dot size etc but I will get to that shortly. For now we'll stick to this tutorial.
Now with your layer prepared go to the colour panel. Where you see all those greys from black to almost white, this is what we will be using. Skin is usually done in 15% grey. Click them and their percent should show up where I marked in red below. For me, mine are off by a surprising amount so I typed in the percent I wanted and hit enter.
You may notice while zoomed in that you have screentones. This is because of the layer settings we set up. To change the dot size if you aren't happy with it, click the tone tab on the properties windy and play with the settings. The changes are instant. When you're satisfied hit ok and continue to tone.
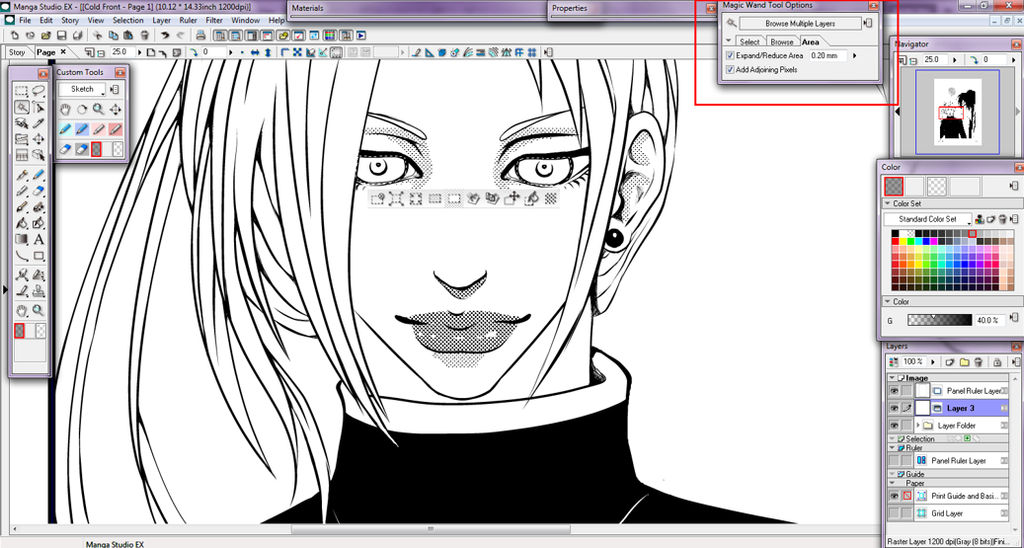
This part is quite important. I want to use gradient for the eyes so I am using magic wand. BUT in tool options choose browse multiple layers. This way I don't have to go back and find that inking layer. Set the expand till it is just on the center of your line art. I've marked this in red below. Once you're select your aread. Hold shift if you wish to add multiple sections like me as I have done so below.
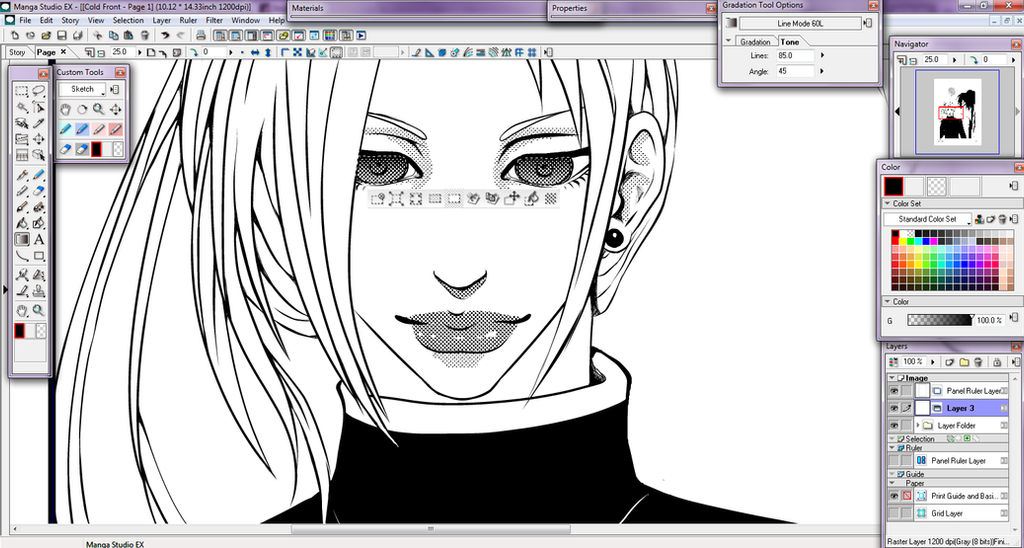
Select gradient tool. In tool options click tone and adjust the settings. Remember, the higher the number the smaller the dots. This is also why I said 1200dpi because it allows a wide range of tone sizes.
Make some light dubs with eraser or select transparent square over white so you don't go over your inking. Or you can leave it in this zoned out look if you choose. It's your work. This is also you you set up gradient tones for clothing. Same process. One thing. If you find your gradient is pale, click undo then select black because it will gradient from colour selected to white or transparent. So if you have 15% still selected it will go from pale grey to white. That is all you have to do to fix that, just like when using gradient in photoshop, it goes by currently selected colours.
Ctrl+D to deselect or Selection menu, Clear Selection or the first icon that may show when you use select tool if you have it enabled.
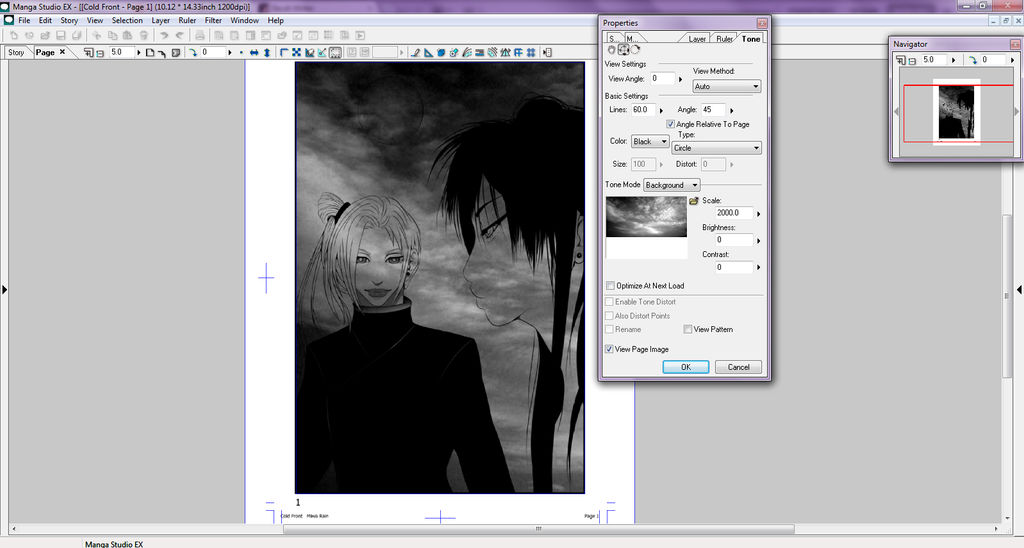
This is the basic's of screentoning in manga studio. If you open through window tab the Materials Panel you can select and drag tones into active areas and go to properties tone to adjust the size as shown below. Took me years to find out how to rescale the materials in the tone library. Of course, neaten and clean
That's all I have to share for now. Next tutorial I will discuss how to use the 3D material for setting up a scene for your characters.
One tip before I go, lower the opacity on super dark tones, erasing is easier when you can actually see it lol and then restore to 100% opacity. Should be an easier way since I know some tones can be to dark to see where your line art is.
Check out the other tutorials on the youtube channel I linked to. Very insightful info on their channel about manga studio.
Hopefully this is helpful, drop a comment if it's not or you have issues.
Super nova
All access to art on demand!
Fun, vibrant images to brighten up your day..
I hope you enjoy using my art for exciting new adventures.
$5/month
Might Return
It's just a maybe at this point. I left DA because I moved on to animation and it's to hard to post animations here. You can catch me livestreaming instead of posting art.
Car Crash Yesterday
Yesterday in my timezone was my birthday and we had a car accident. The car is totalled and of course we need a new one. I'm okay, everyone was okay, just an unfortunate accident. I would open commissions but past experiences has taught me it's ultimately pointless so I won't bother this time. I will also unlikely be around on DA much at all except to dump a bit of art and run. I am mostly active on Twitter and YouTube now or livestreaming rather than DA since it seems DA is pretty dead these days.
I don't know what we are going to do but hopefully something will work out.
After Commissions Taking A Break
A lot is going on in my life right now and after I finish up my commissions I will be going on a break.
Demonetized
With the new rules, my channel will be getting demonetized. So if you have issues with the ads, then please don't take it up with me anymore, email youtube. Even better, get an AdBlocker extension from the extensions store on google chrome or for firefox. There's plenty out there that block those annoying and unskippable ads.
Comments14
Join the community to add your comment. Already a deviant? Log In
Any walk thoughts on what pen is the best to use and how to perfect it?
